Making progress in Photoshop! Finally!
So, after becoming so frustrated with Illustrator that I had to stop myself from throwing my laptop into the lake, I decided that I would attempt to make the logo I am picturing in Photoshop for my imaginary cupcake/party planning business. TA-DA!!!
Isn't that adorable? It only took me about an hour... maybe a little more. I know that logos are better suited as vectors - which, I learned through the magic of the internet, are basically files that could be enlarged infinitely (think, billboards and bus wraps). Since I have no bus to wrap or billboard to design, and for the safety of my laptop, because I have become more comfortable in Photoshop over the past few weeks, I figured why not try it. I watched a few YouTube tutorials... like this one:
And I was off and running. Maybe since I at least have a little experience with Photoshop, the tools are more intuitive for me than the mysterious interface of Illustrator. So it wasn't that bad! I'm actually pretty proud of my Good Witch Cupcakery and General Party Magic logo! It's good to feel like I finally accomplished something worthwhile with this Major Project I so crazily proposed!!
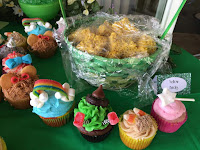
Next, I figured I'd make a cupcake menu for a Wizard of Oz party. I wish I had thought to take individual pictures of the seven different types of cupcakes I'd made last year... but at the time it never crossed my mind - at 4 in the morning - as I was making 2 dozen tiny fondant bows and using icing to glue Hershey's Kisses to mini York Patties to make witch hats.


So I took as many of the big display photos that I could find and attempted to locate unobstructed views of each variety. If I found one then I just cut the pixels around the cupcake that I wanted, placed it on a transparent background and dragged it as a new layer onto my menu. The hard part were the few cupcakes that I didn't have whole-form images of. So I cut out what I could, then copied and mirror-image flipped chunks of the bases or frosting and Frankensteined together 2 complete cupcakes. Bet you can't tell which ones...
One of the most important things I learned was how to manage my layers. With 7 different individual cupcakes, 14 text boxes and 7 colored rectangles plus the division lines, etc. I kept getting confused. There were like 40 layers! BUT, from my Lynda.com tutorial that my graphic artist friend was nice enough to give me access to (but I cannot pass the link on to you) I learned that you can group similar layers in to folders, which you can collapse and make your project way more manageable.
 |
| See, I put all the cupcake names into one folder... |
 |
| Then I can collapse the folder with the little arrow by it and get them out of my view! |


No comments:
Post a Comment